

Everything you need to use your Cloud Computing account, including login instructions and how to manage your computing environment.
CCSS Cloud computing accounts are associated with your normal Cornell Email Credentials. You can access the shared cloud computing resources through your browser or a local application.
Interested in learning what software is available through a CCSS Cloud Computing Solutions Account? View the list here.
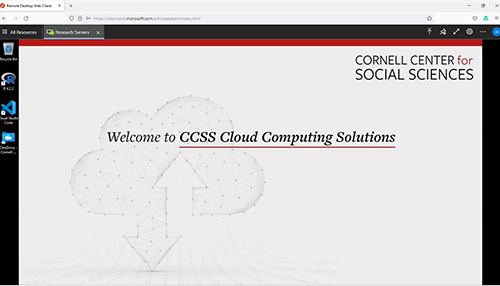
This tab provides instructions to access the CCSS Cloud Computing Solutions using a web browser.
Getting started:
- Both mac and windows users can connect through web browser.
- Open the latest version of a web browser (Chrome, Safari, Firefox or Edge)
- Go to following link: https://client.wvd.microsoft.com/arm/webclient/
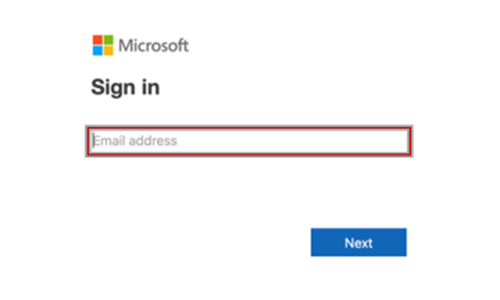
- Sign into Microsoft with your regular Cornell University email and password:
- Cornell email address: Example - jrg363@cornell.edu
- Cornell email password: Example - Cornell password

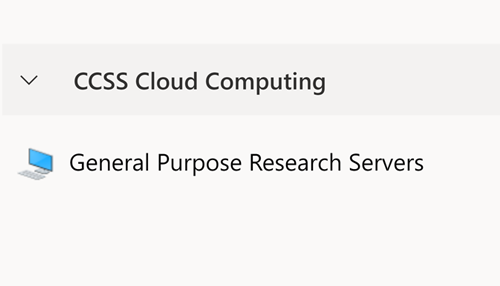
You will be presented with an item under CCSS Cloud Computing:
- Double-click item to sign in
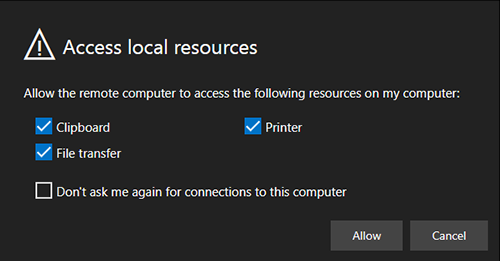
You will be displayed the following pop-up window:
- Click ‘Allow’ to proceed
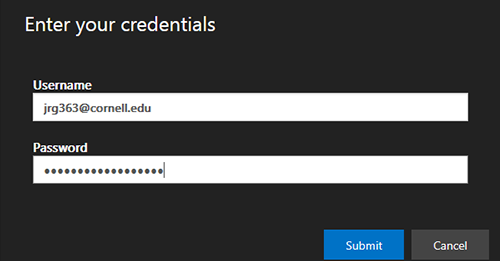
Sign in with your regular Cornell University email and password.
- Username:
- Cornell email address: Example - jrg363@cornell.edu
- Password
- Cornell email password: Example - Cornell password
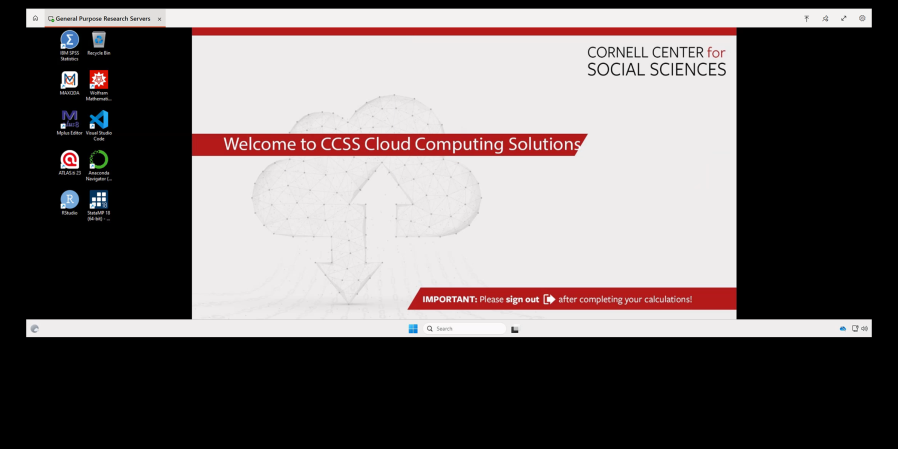
The Remote Desktop Web Client looks like this:
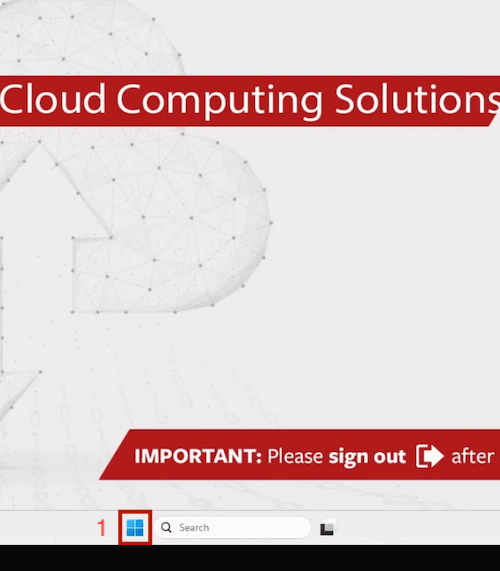
BEFORE YOU LEAVE:
Important information about the correct way to ‘Sign Out” of the CCSS Cloud Computing Solutions resources as shown in this gif.
Need More Support?
Encountering Issues?
Sign in using Application (Mac)
Sign in using Application (Windows)
This tab provides instructions to access the CCSS Cloud Computing Solutions using the ‘Microsoft Remote Desktop’ Mac client.
Getting started:
The first two sections have detailed instructions to install and setup the ‘Remote Desktop’ client application (to be done once). The last section contains instructions to connect to the CCSS Cloud Computing Solutions.
- Download and install the Windows App(Formely 'Microsoft Remote Desktop') app.
- Initial ‘Microsoft Remote Desktop’ Setup (to be done only once)
- Open ‘Microsoft Remote Desktop’ from Applications ‘Workspaces’ tab
- Click Plus icon, ‘Add Workspace’

Next Steps:
- Input the following for ‘Email or workspace URL’: https://rdweb.wvd.microsoft.com
- Click ‘Add’

Signing in:
- Sign into Microsoft with your regular Cornell University email and password:
- Cornell email address: Example - jrg363@cornell.edu
- Cornell email password: Example - Cornell password
You will be presented with an item under CCSS Cloud Computing:
- Double-click item to sign in.
- Sign in with your regular Cornell University email and password.
- Username: Cornell email address. Ex: jrg363@cornell.edu
- Password: Cornell email password. Ex: Cornell password

The Remote Desktop Web Client looks like this:

BEFORE YOU LEAVE:
Important information about the correct way to ‘Sign Out” of the CCSS Cloud Computing Solutions resources as shown in this gif.
Need More Support?
Encountering Issues?
Sign in using Web Browser
Sign in using Application (Windows)
This tab provides instructions to access the CCSS Cloud Computing Solutions using the ‘Remote Desktop’ Windows client.
Getting started:
The first two sections have detailed instructions to install and setup the ‘Remote Desktop’ client application (to be done once). The last section contains instructions to connect to the CCSS Cloud Computing Solutions.
- Download and Install ‘Remote Desktop’ Windows Client Application:
- Download the ‘Remote Desktop’ client application here
- Install the downloaded client application
- Click through installation and accept the default settings
- Initial ‘Remote Desktop’ Setup (to be done only once)
- Open ‘Remote Desktop’ client application installed from earlier step
- Click ‘Subscribe with URL’
- Input the following URL.: https://rdweb.wvd.microsoft.com/
- Click ‘Next’

Signing in:
- Sign into Microsoft with your regular Cornell University email and password:
- Cornell email address: Example - jrg363@cornell.edu
- Cornell email password: Example - Cornell password

You will be presented with an item under CCSS Cloud Computing:
- Double-click item to sign in
- Sign in with your regular Cornell University email and password:
- Username:
- Cornell email address: Example - jrg363@cornell.edu
- Password:
- Cornell email password: Example - Cornell password
- Username:

The Remote Desktop Web Client looks like this:
BEFORE YOU LEAVE:
Important information about the correct way to ‘Sign Out” of the CCSS Cloud Computing Solutions resources as shown in this gif.
Need More Support?
Encountering Issues?
Sign in using Web Browser
Sign in using Application (Mac)
This tab provides instructions for accessing the Active Project Storage (Z Drive).
For optimal performance store all your active project data on the Z drive.
When a professor authorizes access for their research group members, you will, by default, be given access to this cloud file storage.
Mapping Your Z Drive:
- Sign in to the new CCSS Cloud Computing Solutions System
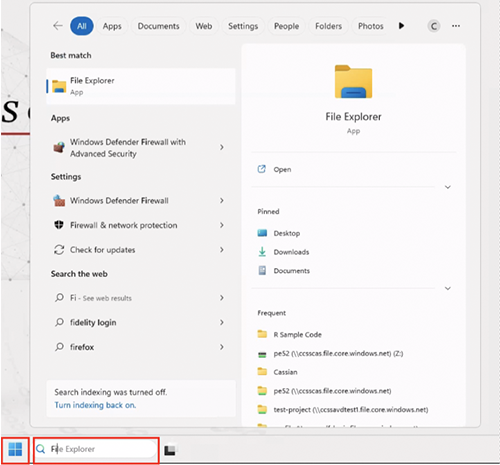
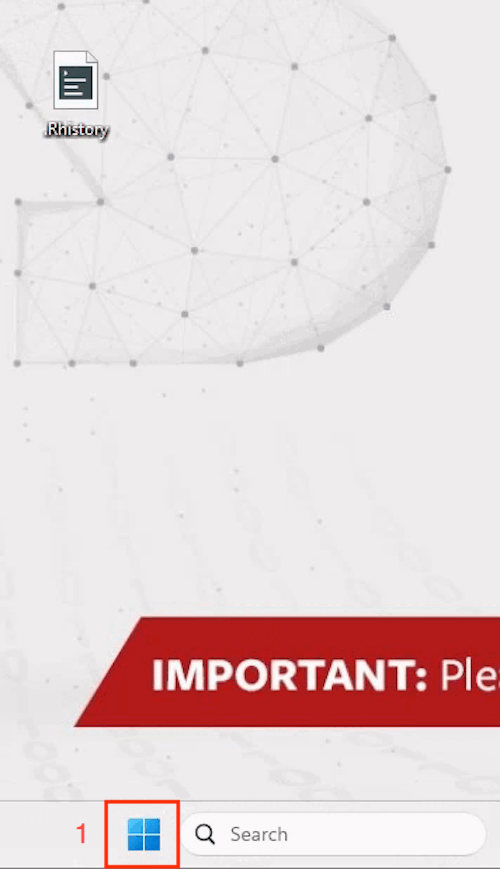
- Open File Explorer by clicking the Windows icon or typing it in the search bar at the bottom of your screen
Mapping Your Network Drive
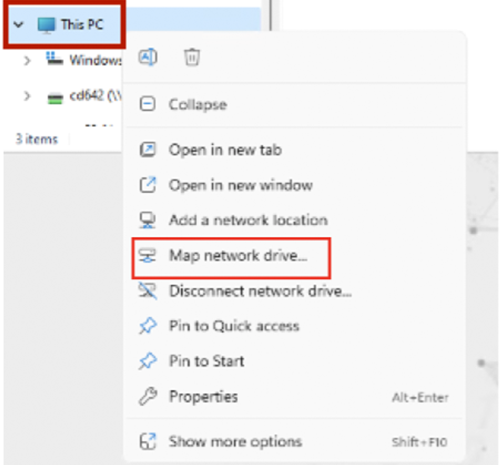
- Inside File Explorer, Right-click ‘This PC’ and select 'Map Network Drive'
Mapping Folder to Z Drive
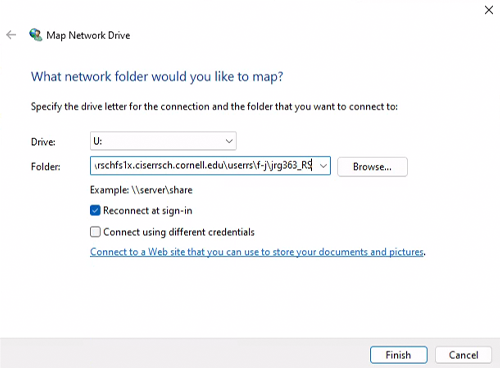
- Set drive to be 'Z' drive.
- Enter one of the paths listed below in 'Folder' to map the drive to your PI's space.
- Keep the ‘Reconnect at sign-in' checked so you do not need to do this again.
- Click 'Finish' when complete.
- Typical nomenclature:
- \\ccss{professor’s_college_acronym}.file.core.windows.net\{Prof_NetID}. Replace <Prof_NetID> with your actual professor’s NetID
- Example: \\ccsscas.file.core.windows.net\pe52

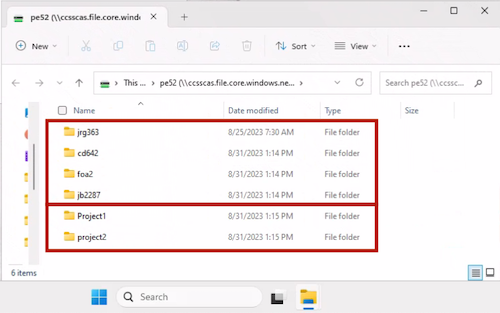
List of Available Paths
- Use one of the available paths listed to the right.
| \\ccssengcis.file.core.windows.net\<Prof_NetID> |
| \\ccsscas.file.core.windows.net\<Prof_NetID> |
| \\ccsscals.file.core.windows.net\<Prof_NetID> |
| \\ccssbpp.file.core.windows.net\<Prof_NetID> |
| \\ccssche.file.core.windows.net\<Prof_NetID> |
| \\ccssilr.file.core.windows.net\<Prof_NetID> |
| \\ccssjcb.file.core.windows.net\<Prof_NetID> |
| \\ccsscvm.file.core.windows.net\<Prof_NetID> |
| \\ccsslaw.file.core.windows.net\<Prof_NetID> |
Recommendation For Shared Project Folders
- It is recommended to have separate folders for shared projects and individual users
Important Notes
- Do not save your data to C drive (Desktop, Documents, Downloads). Data saved here is not recoverable and will limit your user experience.
- There is a default limit of 500 GB for each research group. The professor can request additional storage capacity if needed by messaging socialsciences@cornell.edu. Additional storage requests are provided in 500GB increments.
- Only store data files you need to be processed (active projects) on the Z drive. There is larger, long term storage upon request available through CCSS. Message socialsciences@cornell.edu and request access.
- Folder Permissions: The default permission is read/write to the entire group. If you need restricted permissions to specific subfolders, contact CCSS.
- By default downloaded files will go to C:\Users\netid\Downloads. Please do not keep files in the Downloads folder. Strongly encouraged to change the default downloads location to the Z drive. View Instructions here. Or copy and paste downloaded files from C:\Users\netid\Downloads to your Z drive then delete the files stored in C:\Users\netid\Downloads
This tab provides instructions for accessing the long term archival storage(Formerly CISER, S drive and U drive).
Long term archival data should be stored on the S drive. For active projects store data on Z drive. You should transfer your active project data from S/U drive to Z drive.
- If you need an account for long term archival storage, Contact CCSS.
Mapping Your S drive and U drive:
- Sign in to the new CCSS Cloud Computing Solutions System
- Open File Explorer by clicking the Windows icon or typing it in the search bar at the bottom of your screen

Mapping Your Network Drive
- Inside File Explorer, Right-click ‘This PC’ and select ‘Map Network Drive'

S Drive Instructions
- Set drive to be 'S' drive
- Check 'Reconnect at sign-in'. Keeping this checked will appear in This PC every time you sign in.
- Check 'Connect using different credentials'. Then enter CISER account credentials
- \\rschfs2x.ciserrsch.cornell.edu\share
This will show a list of all the Shared folders associated with CCSS. Find the one you are looking for to use. You will only have access to the folders you have been approved to use.

U Drive Instructions
- Set drive to be 'U' drive
- Check 'Reconnect at sign-in'. Keeping this checked will appear in This PC every time you sign in.
- Check 'Connect using different credentials'. Then enter CISER account credentials
- Select the path based on what letter your CISER account begins with:
| A-E: \\rschfs1x.ciserrsch.cornell.edu\userrs\a-e\netid_RS |
| F-J: \\rschfs1x.ciserrsch.cornell.edu\userrs\f-j\netid_RS |
| K-Q: \\rschfs1x.ciserrsch.cornell.edu\userrs\k-q\netid_RS |
| R-Z: \\rschfs1x.ciserrsch.cornell.edu\userrs\r-z\netid_RS |
- Example:
- CISER account: jrg363
- \\rschfs1x.ciserrsch.cornell.edu\userrs\f-j\jrg363_RS
Enter Network Credentials
- When signing in, enter username as: ciserrsch\netID_RS
- Use your CISER username and password. If you need a new password, email socialsciences@cornell.edu

Notes
- Mapping your CISER files can result in the file explorer being sluggish.
- Contact CCSS for code to automatically map CISER files upon sign in
- Best practice is to transfer active project data from CISER filing system to Z drive.
This tab provides instructions for moving data between Z drive and long term storage.
Robocopy
This is the fastest option for transferring big data.
- Sign into CCSS Cloud Computing Resources
- Map network drives: Z drive, Long Term Storage
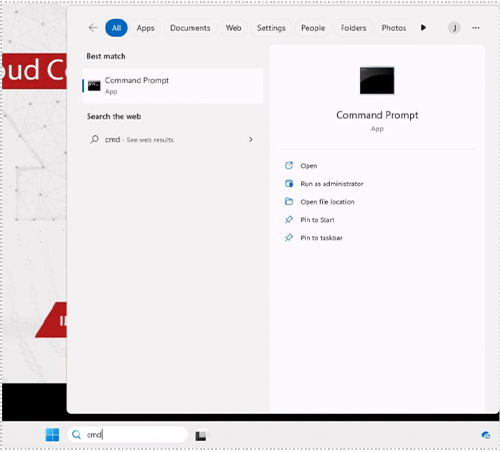
- Click Search bar bottom of screen
- Type ‘cmd’
- Open Command Prompt displayed in results

Use the following syntax to transfer your files:
robocopy <source> <destination> /MT /Z /E
Example copying from long term storage (S drive) to Z drive:
robocopy “S:\consultants\Source\dynare-5.4-win33” “Z:\jrg363\destination” /MT /E /Z

Other Data Transfer Options
- Copy and Paste
- Cloud Storage through browser (Cornell Box, OneDrive)
- If you need assistance transferring large datasets, Contact CCSS
D-drive is a local disk drive, and some applications can see a performance improvement if temporary scratch files are written to that drive instead of the Z-drive. Please see important note below. Please email or schedule a consultation if you have any questions.
IMPORTANT: (D:)' Drive' is Temporary storage. If you have stored files there, please transfer them back to the Z drive. The D-drive is intended for temporary use only as scratch space, and any files stored there will not be accessible the next time you sign in. There is no way to recover files you may have saved on D-drive after session sign out.
Sign Out. Why is it important?
When you have completed your calculation, you should Sign Out, so the resource is available to someone else. This will stop charges accumulating for your account and help ensure optimized use of the Cloud resources for all Social Science researchers at Cornell.
Note: Just closing the ‘Remote Desktop’ client or the web browser will not sign you out of the CCSS Cloud Computing Solutions resources. Please follow the steps below to correctly sign out.
There is an icon on the desktop named 'Sign Out'. Double click on that to properly exit the remote resource.
Desktop Shortcut
There is an icon on the desktop named 'Sign Out'. Double click on that to properly exit the remote resource.

Alternative Steps for Signing Out
Option 1
- Right Click on Start Menu
- Hover over 'shut down or sign out'
- Click on 'Sign out'
Option 2
- Open Start Menu
- Click on the Profile icon of your name on the bottom left
- Select ‘Sign out’
Make sure to include commands that will save your results as your program progresses.
Use these commands at the bottom of your code to automatically sign you out after your program is finished.
Disconnecting
When you are running your calculations on the server, you may remain active on the server or disconnect and come back later to check the status of your calculations. While disconnected, your calculation/application/code will continue to run on the server.
Closing the ‘Remote Desktop’ client or the web browser will disconnect your session, not sign you out. The next time you sign in, you will pick up where you left off.
Due to the nature of Cloud Computing, if you are active or disconnected, you are consuming a ‘seat.’ So, if you are not running a calculation, it is effectively wasting resources. Please Sign Out (see above) if you have completed your calculations to optimize the use of resources and keep costs down for everyone.
How to Auto Sign out After Code Completes
Add the code included below to the bottom of your script files to automatically sign out of the CCSS Cloud Computing Resources once your code finishes. Doing this makes your code and session processes more efficient.
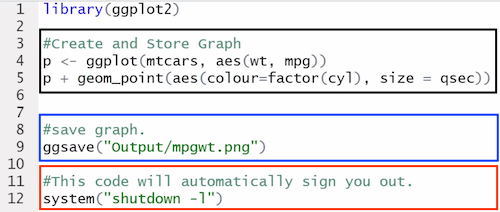
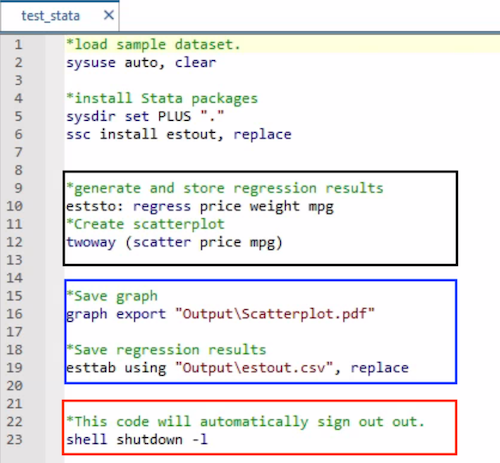
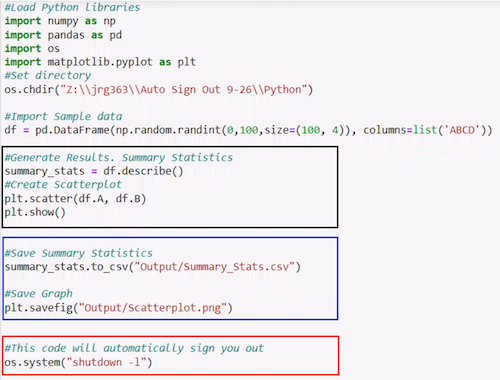
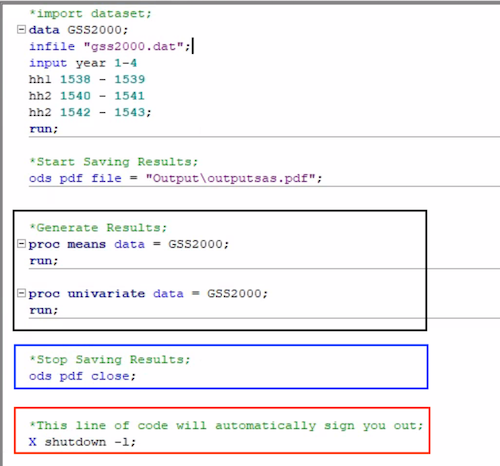
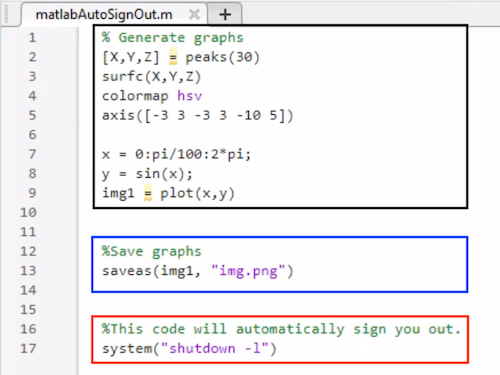
Black borders show code for generating results
Blue borders show code for saving results created from results created earlier.
Red borders show code to automatically sign out properly by software application
R
#Generate results
#Save results
#Use code below at bottom of R script to automatically sign out
system("shutdown -l")
Stata
*Generate results
*Save results
*Use code below at bottom of Stata script to automatically sign out
shell shutdown -l
Python/Anaconda
%Generate results
%Save results
%Use code below at bottom of Python/Anaconda script to automatically sign out
import osos.system("shutdown -l")
SAS
*Generate results;
*Save results;
*Use code below at bottom of SAS script to automatically sign out;
X shutdown -l;
MATLAB
%Generate results
%Save results
%Use code below at bottom of MATLAB script to automatically sign out
system("shutdown -l")
Change Default Downloads Location
Getting Started:
- Sign into CCSS Cloud computing Resources
- Select blue Windows icon next to search bar at the bottom of your screen
- Open Microsoft Edge by selecting app
- Sign into your cloud storage account

Selecting Downloads:
- Select 'Downloads" from menu options

Changing default downloads location to Z drive:
- Change default downloads location to Z drive
- Download files
![]()

